It is optimal to use image field options to display photos when a template allows for it, but you can embed an image directly into the body content of a page when needed.
Note: Not all browsers will support image resizing within the WYSIWYG box. For best performance, we recommend using Firefox when working with WYSIWYG content.
1. Place the cursor where you want to insert the image.
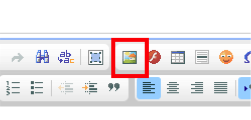
2. In the WYSIWYG toolbar, locate and click the "Insert/Edit Image" button (an illustration of a portrait.) (shown above).
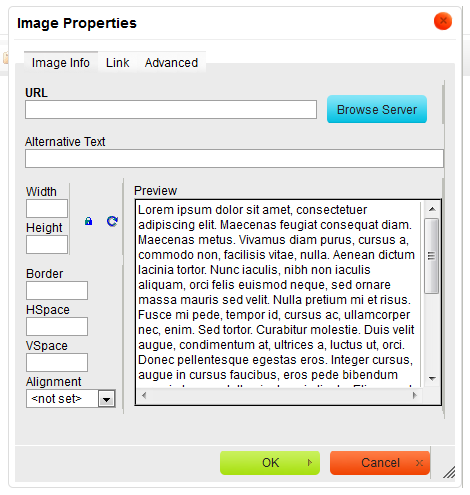
The Image URL field is going to contain the path (or location) of the image.
3. To upload, or select images, and add their path, click the Browse Server button to the right of this field. Clicking the browse button will open a new window.
4. This file browser window (displayed below) allows you to upload and delete images that are already uploaded to your site.
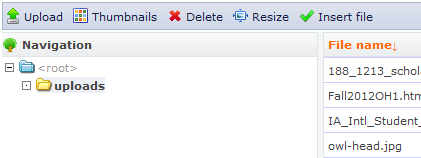
- To Upload a new image, click the Upload button in the top left corner, select Browse..., locate and select the image file from your hard drive, and click upload. This file listing at the right will refresh when the upload is complete, but the upload popup will not automatically close. Close the upload popup at left.
- Locate and select this file, and click the green checkmark button labeled "Insert File."
5. This will autopopulate the Image URL field.
Optionally, to assign a link to the image, click the “Link” tab and assign the link url and target.
Optionally, you can add text to the alternative text field, and adjust other CSS options.
For accessibility compliance, be sure to assign Alternative Text (Alt Text) that describes the contents of the image/photo. Alt Text should not include the words "photo", "image", "pic", "picture" as part of the description.
6. Select insert to place the image into your content.
The image should now appear within the WYSIWYG field, and you can resize and place it as you see fit.